ProjectCam - How To
Several readers have written to inquire about the technology behind ProjectCam. ProjectCam is our webcam which we use to broadcast live images on Pigeon Point Project. When we’re working on something cool (and when we remember), we aim the camera at our project area. Other times we just aim it out the window, or point it inside at the cats.
Setting up your own ProjectCam is relatively easy. It will cost around $100 for a simple setup (less if you find a good deal on a camera), or you can spend more for something fancier. The main equipment you’ll need is the camera itself. Ours is a DLink DCS-5300W.
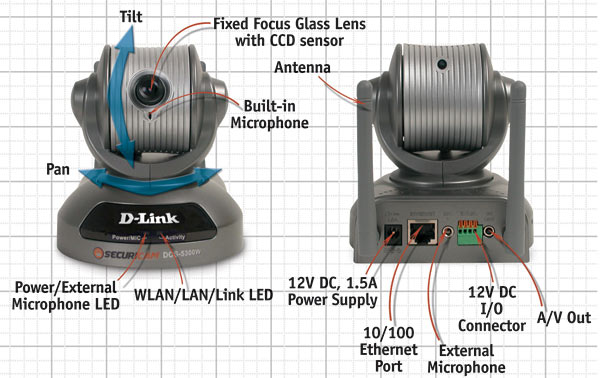
Our setup has a couple of neat features. The first is that our camera is wireless. That means that aside from the power cord, we don’t have to tether it to anything like a computer or a network hub. Rather, it connects to our wireless home network just as our laptop computers do. For this type of camera to work, of course, you need a wireless network setup. A basic wireless network can be had for as little as $50, if you shop around.
The second cool feature our camera has is “remote control”. That is, it can be aimed remotely using either an infrared remote control (like a TV remote), or via a web page which we can access from our computers. Pretty neat.
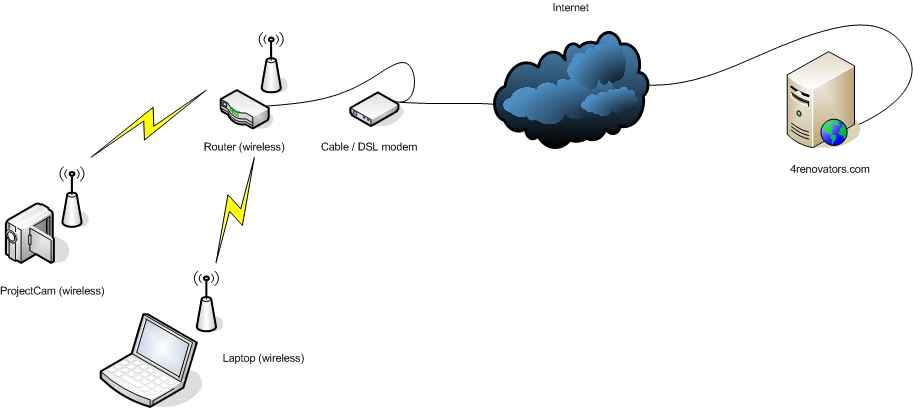
If you opt for a non-wireless camera, the likelihood is that the camera will need to be plugged into your home network. If you have a single computer connected directly to your DSL or cable modem, you may not have a home network in place – you will need to buy a router. A router sits between your DSL or cable modem and your computer, and provides several ports to plug in different computers (or, in this case, a webcam). Of course, a wireless router could be substituted. I recommend that if you’re buying a new camera and a new router (especially if its wireless) to get the same brand. It took a while to get my DLink camera to talk to my LinkSys wireless router – primarily because the DLink made assumptions that it was connecting to a DLink-brand router. Even if they’re NOT the same brand, they should work – you may just have to fiddle with the settings.
Here’s a basic diagram showing how ProjectCam is configured at Pigeon Point Project:
I don’t recommend setting up a ProjectCam if you have a dial-up connection. For one, it will be too slow. Also it’s more complex to set up a home network with dial up (but it can certainly be done.)
Webcam’s generally DO NOT connect directly to your computer, so your computer DOES NOT have to be on for the camera to work. These cameras connects directly to the Internet via your home network, and can be set to automatically upload images to your website. We’ve configured ours to upload a new image to Pigeon Point Project every 5 seconds. It is also possible to stream live video to your website, but there are considerations for this that may make such a feature undesirable. The first is cost and complexity. To stream live video from your home network to the internet, you need to set up a “static IP”, which is usually an additional cost from your network provider. Once you have this, your camera can broadcast video directly from your home network to visitors on your website. Note that I said “directly” – this means that the video stream eminates from your home, not from your website. The website simply redirects the video request to the new IP address which is your home network. (Note too, that this raises lots of security issues). On top of this, visitors to your website will likely have to download a special program to view the video, since most consumer cameras don’t output in a format that directly supports Windows Media or Quick Time.
Problems aside, placing a live video feed on your site would be very cool.
Uploading a new image every 5 seconds seems to be an adequate compromise. The way the camera achieves this is to use FTP. FTP is a simple means to upload files to your site. You may use FTP to update your website already. If you don’t, you will need to research to find out whether your website host provider offers you FTP access.
The webcam will likely be configurable using a special webpage described in the owner’s manual. One of the configuration options will be FTP (make sure the camera offers this feature before you buy!). You’ll need to configure the camera with the FTP address of your site, the directory on the site where the picture should be placed, and the username / password of the FTP account. You’ll also be able to configure the frequency of the upload. Our camera has the option to upload a picture to the same location and filename with each upload, effectively replacing the previous upload. This allows you to craft your webpage (blog) to always load the latest picture very easily.
One more note about uploading pictures. Our web host for Pigeon Point Project doesn’t charge us for uploading data to the site – only for downloading. That means that it is free for us to upload new images every 5 seconds. You should check with your webhost to verify they have a similar policy – it could quickly get expensive to have to pay for additional bandwidth just for uploading a constant barrage of images.
The next trick is to have the webpage automatically refresh the picture every 5 seconds with the latest image. This is achieved with some javascript code inside the webpage. The javascript code runs inside the user’s web browser (like Internet Explorer) when they load the page, and tells the browser to re-load the image on a set frequency.
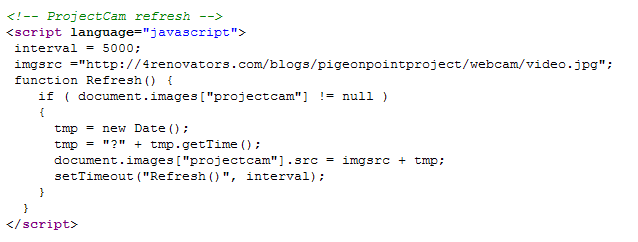
The first part of the javascript is a method to refresh the image. On Pigeon Point Project I placed this code block before the page’s element:
There are a couple of things to notice here:
interval = 5000;The variable “interval” is set to 5000 – that’s 5000 millisconds, equal to 5 seconds.
imgsrc ="`http://4renovators.com/blogs/pigeonpointproject/webcam/video.jpg`";The variable “imgsrc” is the URL that refers to the picture. This should resolve to the same location that the camera is uploading pictures to.
if ( document.images["projectcam"] != null )This line of code checks to see if the page has an image tag that is named “projectcam”. When you place the image on the page, you’ll have to give it the same name as specified here. If there’s no image named “projectcam”, then this function won’t do anything.
 tmp = new Date();
 tmp = "?" + tmp.getTime();
 document.images["projectcam"].src = imgsrc + tmp;
This is a trick. The code is appending a parameter to the URL of the image, and the parameter is the current time. This is done to trick the browser into reloading the image. Without the trick, the browser will retrieve the image from its local cache, and it wont ever reload from the website. The parameter (with its ever-changing current-time value) tricks the browser into thinking it is loading a new image – which it is.
setTimeout("Refresh()", interval);This line ensures that the Refresh() method will be called again – indefinitely while the page is displayed. It will be called every 5 seconds, or whatever the interval is set to.
The last thing you need to do in your HTML is to place an image (“img”) tag in the page that shows your live image:

Note that the “id” of the tag is set to “projectcam” – this is important so that the javascript Refresh() method we wrote can find and update the image.
1 Comment
Duncan Aitchison·April 1, 2007
Great advice but i can’t get it to work on my website. I’ve written you a separate email explainingthe problem. Any help/advice gratefully received.
Duncan